


Reliance


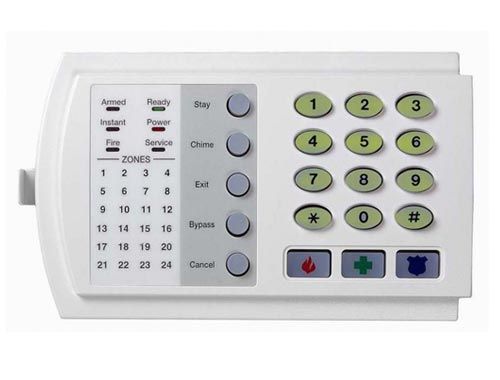
Arm Disarm Bypass
ARMING YOUR SYSTEM IN THE “ON” MODE.
ON is used when the user is away from the premise and wants the interior protected. Listed below are the steps to arm in the ON Mode:
| Step 1 | Close all protected doors and windows. |
|---|---|
| Ready light will be on or flashing when all protected zones and sensors are secure. NOTE: If any zones are bypassed, a sensor in that zone can be violated without affecting the ready light. | |
| The security system will not arm if the ready light is not on or flashing. | |
| If the power light is off, you have no AC power. Restore power if possible. If not,contact your installation company listed on page 1 of this booklet for service. | |
| Step 2 | Enter your 4 or 6 digit user code to arm the system. The armed and exit lights will illuminate. You may now leave the building. |
Note: The exit light will flash rapidly for the last 10 seconds of the exit delay as a warning to the user that the exit time is about to expire. The user may wish to press the [Exit] key to start the exit delay again or disarm and rearm the system if more time is needed.
ARMING SYSTEM IN “PARTIAL” MODE
PARTIAL is used when the user is inside the premise and wants protection around the perimeter. Listed below are the steps to arm in the PARTIAL Mode:
| Step 1 | Close all protected doors and windows. |
|---|---|
| Ready light will be on or flashing when all protected zones and sensors are secure. NOTE: If any zones are bypassed, a sensor in that zone can be violated without affecting the ready light. | |
| The security system will not arm if the ready light is not on or flashing. | |
| If the power light is off, you have no AC power. Restore power if possible. If not,contact your installation company listed on page 1 of this booklet for service. | |
| Step 2 | Press the [Partial] key. The bypass light will illuminate if any zone(s) is bypassed. The light(s) corresponding to the bypassed zone(s) will illuminate,alerting the user that a zone(s) may be unprotected and can be faulted without an alarm. |
USING THE QUICK ARM(Optional, if programmed)
The Quick Arm feature may be used if it is enabled. Quick Arm will allow the user to arm the security system in the ON mode by pressing the [ON] key. The system can be quick armed in the Partial mode by pressing the [PARTIAL] key. This feature is used for ARMING ONLY, and should not be enabled to disarm the security system. This is ideal for a maidor baby sitter code, etc.
DISARMING THE SYSTEM
When you enter the protected area through one of the designated Entry/Exit doors, the codepad control will sound a solid continuous tone for the duration of the entry delay time, or until you enter a valid code. After entering a valid code the red armed light will go off and the tone will stop. The security system is now DISARMED. If a valid code is not entered before the end of the entry delay, an alarm will occur. (NOTE: If the red armed light is flashing during the entry delay, the alarm system has been activated in your absence.Leave the building immediately and call your alarm company and/or the police from a safe location.)
BYPASSING ZONES
If you wish to bypass one or more zones, this must be done while the system is in the disarmed state. The following steps are used for bypassing zones:
| Step 1 | Press the [BYPASS] key. |
|---|---|
| Step 2 | If required (optional), enter user code, if required (optional). |
| Step 3 | The bypass light flashes. |
| Step 4 | Enter a 2 digit zone indicating the zone you wish to bypass. (Example: Press the [0]- [1] key for zone 1, press [1] – [2] for zone 12.) |
| Step 5 | Press the [BYPASS] key again. |
| Step 6 | The corresponding zone light will illuminate indicating the zone has been bypassed. Repeat 4 for any other zone(s) that need to be bypassed. |
| Step 7 | Press the [BYPASS] key again or press the [#] key to exit the Bypass Mode. The Bypass light will stop flashing upon exiting the Bypass Mode. |
UN-BYPASSING
To manually un-bypass zones, perform the bypassing procedure on a zone that is already bypassed. The corresponding light for that zone will go off when un-bypassed. NOTE: All zones will automatically be un-bypassed each time the system is disarmed.
GROUP BYPASS
By pressing the [BYPASS] key, followed by the [0][0] key, then the [BYPASS] key again, all zones that are designated as group bypass zones will be bypassed. Now you can arm your system in either the [ON] or [PARTIAL] mode. Once armed (and the bypass toggle feature is enabled) press the [BYPASS] key again to exit group bypassing.
Clear Alarm Memory
Whenever an alarm activation occurs on your system, all zones that were in alarm during that activation will be held in memory. The last alarm activation can be reviewed via the function listed below. i.e. You can see which area has activated the alarm.
- Press [s] [3].
- The ALARM MEMORY feature will flash those zones that created alarms and will light steady those zones that were bypassed during the last alarm.
- Press [#] to exit.
Door Chime Feature
TURNING THE DOOR CHIME ON AND OFF
The door chime is turned on or off by pressing the [CHIME] key while the system is in the disarmed state. If the chime is on, the chime light will be illuminated. If the chime is off, the chime light will be off. Each press of the [CHIME] key will toggle the chime feature on/off and produce a momentary ding-dong sound.
Fire Alarm Reset
VIEW ALARM MEMORY
Step 1 Press the [p] key.
Step 2 Press the [3] key.
Step 3 The ALARM MEMORY feature will flash those zones that created alarms and will light steady those zones that were bypassed during the last alarm.
RESET SMOKE DETECTORS
This function is used to reset Smoke Detectors, Zone Troubles, and Zone Tampers.
Step 1 Disarm the system if not disarmed.
Step 2 Press the [p] key.
Step 3 Press the [7] key.
Reset has now been performed.
Step 4 If the code pad begins beeping, the reset did not execute properly. Enter your code to silence the code pad. Wait a few minutes and repeat step 2 to attempt another reset. If the code pad still beeps after repeated attempts,please contact your installer.
Function Keys
NOTE:You must hold these keys for 2 seconds to activate these functions. Your system may not be programmed for these activation keys (see page 1). You should press these keys only in an emergency situation that requires response by emergency personnel. If your system is programmed for these functions, the following reports can be sent.
Fire Key – This key can activate the fire alarm when pressed for two seconds.If your system is connected to a monitoring centre, an emergency report could be sent to that centre.
Auxiliary Emergency Key – This key can activate the auxiliary alarm when pressed for two seconds. If your system is connected to a monitoring centre,an emergency report could be sent to that centre.
Police (Panic/Hold-Up) Key – This key can sound a local audible alarm when pressed for two seconds. If your system is connected to a monitoring centre,an emergency report could be transmitted to that centre. NOTE: Some Panic/Hold-Up alarms are programmed to be silent at the protected site while reporting an alarm to the monitoring centre. Check with your installation company to determine how your security system will respond to the Panic/Hold-Up activation.
Setting Date & Time
SET SYSTEM DATE
Step 1 Press the [*]-[9]-[6].
Step 2 Enter the “Master Code”.
Step 3 Enter the “Day of Week “
| 1 = Sunday | 3 = Tuesday | 5 = Thursday | 7 = Saturday |
|---|---|---|---|
| 2 = Monday | 4 = Wednesday | 6 = Friday |
Step 4 Enter the “Month Code”. This must always be two (2) digits.
| 01 = January | 05 = May | 09 = September |
|---|---|---|
| 02 = February | 06 = June | 10 = October |
| 03 = March | 07 = July | 11 = November |
| 04 = April | 08 = August | 12 = December |
Step 5 Enter the “Day Code”. This must always be two (2) digits. Example: The 5th would be entered as [0]–[5].
Step 6 Enter the last two digits of the “Year Code”. Example: For 2000 enter [0]–[0].
SETTING THE SYSTEM CLOCK
Step 1 Press the [*] key.
Step 2 Press the [9]-[7] keys.
Step 3 Enter the “Master Code “.
Step 4 Enter the “hour code” which must be two (2) digits. Note: The clock is a 24hour clock.Example: 12.00 am would be entered as [0]-[0], 7.00 am would be entered as [0]-[7], and 5.00 pm would be entered as [1]-[7].
Step 5 Enter the “minutes code” which must be two (2) digits. Example: 7 minutes after would be entered [0] – [7].
Test Mode Function
TEST FUNCTION – Optional
If programmed, this function will perform a battery test, communicator test, and a siren test. No alarms will be sent, and no reports will be sent unless the communicator test is enabled.
Step 1 Press the [p] key.
Step 2 Press the [4]-[4] key. The test will be performed as programmed.
Step 3 If the siren test is performed, enter a user code to silence the siren.
No alarms will be sent and no reports will be sent unless a communicator test is performed, at which time a test signal will be sent.
WALK-TEST MODE –
Step 1 Press the [p] [Chime] key.
Step 2 Enter a “Master Arm/Disarm Code”. Now all zones become 24 hour, silent,and local (non-reporting zones). By faulting any zone, that zone will latch its zone light on the LED code pad, and sound the Chime. The Chime will continue to sound each time a zone is faulted. Once all zones are tested(zone lights lit on the LED code pad), go to Step 3.
Step 3 Press a “Master Arm/Disarm Code”.
Trouble Messages
SERVICE MENU
The service light will be “on” if the security system requires service. If the service light is“on”, press the [p] key followed by the [2] key to determine the service condition. One or more zone lights will illuminate indicating what service(s) is required. Call your service provider immediately for these problems. Below is a listing of what each light means in a service condition.
| LIGHT | PROBLEM | ||
|---|---|---|---|
| SYSTEM FAULT – Press the [1] key. The zone light(s) that is illuminated corresponds to the system fault(s) below: | |||
| 1 Over Current Fault | 5 Expander Low Battery | ||
| 2 Siren Trouble | 6 Expander Box Tamper | ||
| 3 Box Tamper | 7 Expander Trouble | ||
| 4 Expander Power | 8 Reserved | ||
| Press the [#] key to return to the 1 of 8 service lights. | |||
| 2 | ZONE TAMPER – Press the [2] key and the zone light(s) will illuminate showing the zone(s) that is tampered. Press the [#] key to return to the 1 of 8 service lights. | ||
| 3 | ZONE LOW BATTERY – Press the [3] key. The zone light(s) will illuminate showing which zone(s) has a low battery. This only applies to wireless zones.Press the [#] key to return to the 1 of 8 service lights. | ||
| 4 | ZONE LOSS OF SUPERVISION – Press the [4] key and the zone light(s) will illuminate showing which zone(s) has loss of supervision. This only applies to wireless zones. Press [#] key to return to the 1 of 8 service lights. | ||
| 5 | ZONE TROUBLE – Press the [5] key and the zone light(s) will illuminate showing which zone(s) has a trouble condition. Press the [#] key to return to the 1 of 8 service lights. | ||
| 6 | RESERVED | ||
| 7 | FAILURE TO COMMUNICATE – This light will illuminate when there is a failure to communicate between your system and the central station. | ||
| 7 | LOSS OF SYSTEM TIME – This light will illuminate when there has been a loss of power and your system clock needs to be reset. Instructions are on page 13. | ||
| Exit | To exit the Service Light Mode – press the [#] key. |
CODE PAD CONTROL TONES (BEEPS)
1 Beeps for all keypresses.
2 Sounds a continuous tone during the entry delay time.
3 Pulses when a day zone is violated while the system is disarmed.
4 Pulses when a fire zone has a trouble condition.
5 Beeps 3 times for trying to arm with the “Ready” light off, if “Force Arming” has not been selected.
6 Beeps for 1 second or emits a “ding-dong” sound for the “Chime” feature.
7 Beeps during an exit delay; beeps rapidly for the last 10 seconds of an exitdelay; and beeps 1 second at the end of the exit delay.
8 Pulses when the armed status changes and the AC power is off.
9 Pulses when the armed status changes and any zone(s) is bypassed.
10 Pulses when the armed status changes and a low battery is detected.
11 Pulses when the armed status changes and a tamper condition is detected. Beeps to indicate telephone line cut, if selected.
12 Pulses when one or more of the following conditions are detected: zone or box tamper, low battery, ac power fail, or expander trouble.
Entering a valid code will silence the code pad sounder when it is pulsing. Please contact your installer if a trouble condition exists.
User code Changes
CHANGING USER CODES
| Step 1 | Your system must be in the Disarmed state to change user codes. |
|---|---|
| Step 2 | Press the [p] [5] keys. |
| Step 3 | Enter a “Master Arm/Disarm Code”. |
| Step 4 | The ready light will flash. |
| Step 5 | Enter the 2 digit “user number” (always enter 2 digit such as [0]-[3] for user 3,or [5]-[2] for user 52). |
| Step 6 | Enter the new four (4) or six (6) digit “user code”. Note: To delete a user code,enter[Chime]-[Chime]-[Chime]-[Chime] for a 4-digit code, or [Chime]-[Chime]-[Chime]-[Chime]-[Chime]-[Chime] for a 6-digit code. |
| Step 7 | The ready light will flash indicating you are back at Step 5 above. If the code is rejected, the sounder will beep 3 times. |
| Step 8 | If another “user code” needs to be programmed, return to Step 6. |
| Step 9 | Press the [#] key while the ready light is flashing to exit the User Code Programming Mode. |
ASSIGNING USER CODE AUTHORITY LEVELS
Assign authority levels to users by following the steps below. Assign user codes before assigning authority levels.
Step 1 Press the [p][6] keys.
Step 2 Enter a “Master Arm/Disarm Code”.
NOTE: Someone changing the authority of another person can only add or remove authorization if they have access to that same authority level.
Step 3 The ready light will flash.
Step 4 Enter the 2 digit “user number” to be assigned authority (The ready light is constant and the partial light will flash).
Step 5 Lights illuminated indicate the authority levels assigned to this code. An explanation of the lights is listed below. You may toggle (turn on/off) the authority level by pressing the number for that authority level.
| LIGHT | AUTHORITY LEVELS IF LIGHT 8 IS OFF | LIGHT | AUTHORITY LEVELS IF LIGHT 8 IS OFF |
|---|---|---|---|
| 1 | Reserved (Note: Do not change if on.) | 5 | Arm/Disarm |
| 2 | Arm Only | 6 | Bypass Zones |
| 3 | Arm Only After Close Window | 7 | Open / Close Reporting |
| 4 | Master Arm/Disarm (can program other codes) | 8 | If this light is on, Press [#] – [#] to exit. |
Step 6 Press the [p][p]. This returns you to Step 3. At this point you may enter another user number to assign authority level. Repeat Steps 4 – 6 until you have assigned authority levels to all user numbers.
Step 7 Press the [#] key to exit the Assigning Authority Level Program.