


NX16 LCD


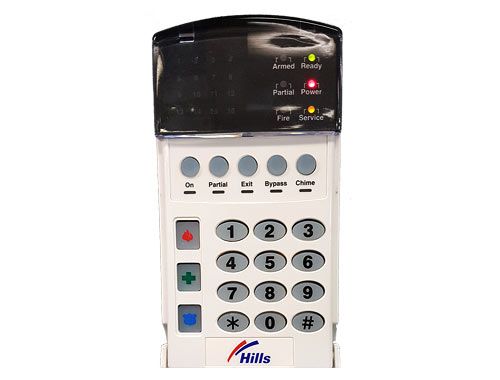
Arm Disarm Bypass
Arming And Disarming Multiple Areas:
To arm/disarm multiple areas, enter a [code] that has arm/disarm authority for ALL of the areas to be armed/disarmed.
The following display will appear on the LCD screen.
| 1–4 –8 Disarm º |
|---|
| –3- 67- Arm º |
The numbers on the top line represent the disarmed areas to which this code has access. The numbers on the bottom line represent the areas that are armed.
The following table describes the possible conditions of an area.
| LCD DISPLAY FOR AREA TOP LINE OVER BOTTOM LINE | CONDITION |
|---|---|
| Blank Blank | Area Not Used or Authorized |
| Dash (-) Dash (-) | Area Not Ready |
| Flashing Area # Dash (-) | Area Ready to Force Arm |
| Dash (-) Flashing Area # | Area Armed Instant |
| Area # Dash (-) | Area Disarmed & Ready to Arm |
| Dash (-) Area # | Area is Armed |
Ø To arm all of the areas, press the [–] down scroll key.
Ø To disarm all of the areas, press the [•] up scroll key.
Ø To toggle the condition of a single area between armed and disarmed conditions, press [s] [Number of Area].
For example, If Area 4 is armed; [s] [4] will disarm Area 4. If Area 4 is disarmed, [s] [4] will arm it.
Operating Individual Areas In The Multi-Area Mode:
Enter a code that is a valid arm/disarm code for the area you wish to operate. The following display will appear on the LCD screen. Only the areas authorized by this code will appear.
| 12-4—78 Disarm º |
|---|
| –3-56– Arm º |
Ø To toggle between the armed and disarmed states of an individual area, press [s] [Area number].
Ø To operate an individual area, enter the number of the area desired. The LCD code pad will now operate as a single area code pad. All keys and functions entered will affect this individual area only. The lights and display represent the status of that area only. The word “System” will be replaced with the word “Area #”.
The following is an example of this feature. To exit this screen, press [#].
| Area 5 Ready |
|---|
| Type code to arm |
Area 5 is selected and Area 5 is ready to arm. To exit the individual area mode, enter [#] [#].
Silencing Alarms In The Multi-Area Mode:
If the code pad is sounding an alarm or the siren is running, it can be silenced by entering a code with the authority for the area(s) that are in alarm.
NOTE: The [EXIT], [BYPASS], and Alarm Memory [s] [3] function keys will only work if an individual area is selected.
Clear Alarm Memory
View Alarm Memory:
1. Press [*] [3] to display the zone(s) on the code pad that created the last alarm.
2. The LCD Screen will display the zone description for those zones.
| Alarm Memory 1 |
|---|
| ZONE 1 |
3. Press [#] to exit the alarm memory.
Reading The Event Log
The NX-16 has a 185 event log that can be retrieved using a master code. This log contains a listing of the last 185 events along with date, time, and partition where the event occurred.
1. To view the log, press [*] [9] [0]. The LCD screen will prompt you for a code.
2. Enter your [master code]. The LCD screen will now show the most recent event.
3. To view the events from most recent to the oldest, press the [–] down scroll key.
4. To view the events from the oldest to the newest, press the [•] up scroll key.
Ø The display contains the following information.
| Open 75 |
|---|
| 9/25 17:57 P3r |
Example shows an opening of Area 3 on September 25 at 5:57 p.m. by user 75. The [*] shows that this event is not programmed to be reported to the central monitoring station.
Door Chime Feature
Using The Door Chime Feature – LCD Keypad:
The door chime is turned on or off by pressing the [CHIME] key.
If the chime is on, the chime light will be illuminated.
If the chime is off, the chime light will be off.
Each press of the [CHIME] key will toggle the chime feature on/off and produce a momentary ding-dong sound.
Fire Alarm Reset
To reset Smoke Detectors, Zone Troubles and Zone Tampers, the Reset Latched Alarms function must be used.
- Enter your [User code] to silence the code pad sounder.
- Enter the reset function [s] [7].
Ø If the code pad begins beeping, the reset did not execute properly.
Ø Enter your [User code] to silence the code pad. Wait a few minutes and repeat the reset function to attempt another reset.
Ø If the code pad still beeps after repeated attempts, Troubleshooting required
Function Keys
Ø You must hold these keys for 2 seconds to activate these functions.
Ø Your system may not be programmed for these activations.
Fire Key – If programmed, you can activate the Fire alarm by pressing the Emergency Activation [Fire] key for two seconds. If your system is connected to a monitoring center, an emergency report could be sent to that center. This key should only be pressed in an emergency situation requiring response by fire department personnel.
Auxiliary Key – If programmed, you can activate the auxiliary alarm by pressing the Emergency Activation [Auxiliary] key for two seconds. If your system is connected to a monitoring center, an emergency report could be sent to that center. This key should only be pressed in an emergency situation requiring response by emergency personnel.
Police (Panic/Hold-Up) Key – If programmed, when the Emergency Activation [Police] key is pressed for two seconds, a local audible alarm will sound. If your system is connected to a monitoring center, an emergency report could be transmitted to that center. These keys should only be pressed in an emergency situation requiring immediate response by law enforcement personnel.
Setting Date & Time
Setting The System Clock/ Date:
1. Enter The LCD Screen will prompt for a code. [r] [9] [7].
2. Enter [Master code]. The time and date will be displayed with the current hour flashing.
3. Use the [•] [–] scroll keys to select the proper hour.
4. Enter the [r] key to move to the minutes, day of week, date, month, and year.
5. Repeat Steps 3 and 4 until the entire time and date are set.
Test Mode Function
Test Function:(Optional, If Programmed)
If programmed, this function will perform a battery test, communicator test, and/or a siren test. No alarms will be sent, and no reports will be sent unless a communicator test is performed, in which case a test signal will be sent.
1. Press [r] [4]. The test will be performed as programmed.
2. If the siren test is performed, enter a [user code] to silence the siren.
Walk-Test Mode:
1. Press [r] [Chime].
2. Enter a [Master Code].
Ø Now all zones become 24 hour, silent, and local (non-reporting zones).
Ø By faulting any zone, that zone will latch its zone light on the LED code pad, and sound the Chime.
Ø The Chime will continue to sound each time a zone is faulted.
3. Once all zones are tested (zone lights lit on the LED code pad), enter a [Master Code].
Trouble Messages
Service Display
The following message will be displayed periodically if the security system requires service.
| Service Required |
|---|
| Type *2 for help |
If you see this display, press [*] [2] . One or more of the following fault messages will be displayed. Use the [<] [>] scroll keys to browse through them. To exit the service messages, press [#] [#].
| Control |
|---|
| Over-current |
A short circuit of a control’s power supply has occurred.
| Control |
|---|
| Siren trouble |
Open circuit has occurred on the bell or siren circuit.
| Control |
|---|
| Box tamper |
(Optional) The Box Tamper circuit has activated.
| Control |
|---|
| Phone trouble |
The phone line connected to the control is not operating properly.
| Control |
|---|
| Fail to Comm. |
The control attempted to communicate a message to the Central Station, but was unsuccessful.
| Control |
|---|
| Ground fault |
A short to ground has been detected on a control circuit.
| Control |
|---|
| Loss of time |
Your system has lost total power and needs the clock reset.
| Control |
|---|
| Power trouble |
The main power to your system is not on.
| Control |
|---|
| Low Battery |
The standby battery is low.
| Expansion |
|---|
| Over-current |
A short circuit of an expansion devices’ power supply has occurred.
| Expansion |
|---|
| Aux. comm. fail |
An auxiliary reporting device has failed to communicate.
| Expansion |
|---|
| Power trouble |
The main power to an expansion power supply is not on.
| Expansion |
|---|
| Low Battery |
An expansion power supply has a low battery.
| Expansion |
|---|
| Box tamper |
A box containing an expansion device has been opened.
| Expansion |
|---|
| Trouble |
An expansion device or code pad is not reporting to the control panel.
| Expansion |
|---|
| Siren trouble |
Open circuit has occurred on the bell or siren circuit of the expander.
| Zone |
|---|
| Tamper, Press* |
A zone is tampered. Press [*] to identify the tampered zone.
| Zone |
|---|
| Low Batt, Press * |
A wireless device has a low battery. Press [*] to identify the zone.
| Zone |
|---|
| Lost, Press * |
A wireless or multiplexed zone device is not reporting to the control. Press [*] to identify the zone.
| Zone |
|---|
| Trouble, Press * |
A zone is experiencing some form of trouble (probably wiring). Press [*] to identify the zone.
Keypad Control Tones (Beeps)
A sounder is built into the keypad and may sound for any of the following reasons:
Ø Beeps for all key presses.
Ø Sounds a continuous tone during the Entry delay time.
Ø Pulses when a day zone is violated while the system is disarmed.
Ø Pulses when a FIRE zone has a trouble condition.
Ø Pulses when the armed status changes and the AC power is off.
Ø Beeps 3 times for trying to arm with the “READY” light off, if “FORCE ARMING” has not been selected.
Ø Beeps 1 second for the “CHIME” feature.
Ø Beeps 1 second at the end of the exit delay.
Ø Beeps to indicate telephone line fault if selected.
Ø Beeps 1 long beep followed by 3 short beeps to alert you that there are only ten seconds remaining in the exit delay.
When pulsing, the keypad sounder may be silenced by entering a valid [User code]. The arm/disarm state of your system will not change when entering a code to silence a pulsing keypad sounder.
Understanding the Lights:
Armed Light: The armed light is “on” when the system is armed. The armed light is “off” when it is disarmed. The armed light will flash when there has been an alarm during the previous arm cycle.
Bypass Light: The bypass light is “on” when any zone in this code pad’s area is bypassed. The zone(s) that is bypassed will also be illuminated. If the bypass light is “off”, no zones are bypassed.
Chime Light: The chime light is “on” when the chime feature is “on”; “off” otherwise.
Exit Light: The exit light is “on” during the exit delay. Please note that the light will flash during the last 10 seconds of the exit delay as a warning that the time is running out. (The user may want to restart the exit delay if the exit light is flashing in order to prevent an alarm. The user may then press the [Exit] key to restart the exit delay before the delay expires.)
Fire Light: A steady fire light means a fire zone has been faulted. A rapidly flashing fire light means that a fire zone is in a trouble condition.
On Light: The on light is “on” when the system is armed. The on light is “off” when it is disarmed.
Partial Light: The partial light is “on” when the system is armed in the Partial Mode. All non bypassed zones will be delayed and follow the Partial delay time. When armed in Partial Mode, the Arm, On, and Bypass lights will also be “on”.
Power Light: The power light is on if the primary power is on. The power light will flash if the system has a low battery condition.
Ready Light: The ready light is “on” when the system is ready to arm and “flashes” if ready to force arm. The ready light is off when the system is not ready to arm because of a zone(s) being faulted.
Lights in Multi-Area Master Mode:
Ø ARMED will illuminate if ALL areas are armed.
Ø READY will illuminate if ALL areas are “Ready”. The ready light will flash if all areas are Ready or Force arm-able.
Ø FIRE will illuminate if ANY one area has a Fire condition. The fire light will flash if ANY area has a Fire Trouble condition.
Ø POWER will illuminate if the primary power is connected to the NX-16 control panel. It will flash if the system has a low standby battery condition.
Ø PARTIAL will illuminate if ANY area has the partial light on.
Ø CHIME will illuminate if ANY area is in the “Chime” mode.
Ø EXIT will illuminate if ANY area is timing an exit delay. It will flash if ANY area is in the last 10 seconds of an exit delay.
Ø BYPASS will illuminate if ANY area has a zone bypassed.
Ø SOUNDER will sound if ANY area has the sounder on. This includes Entry delay, Exit delay, Chime, and Alarm.
User Code Change
Changing User Codes:
1. Press [s] [5]. The LCD Screen will prompt for a code.
2. Enter [Master code]. The LCD Screen will prompt for a user number.
Ø For partitioned systems, if you are changing the code of another person, you must have access to all partitions, or at least all of the partitions to which the other person has access.
3. Enter the 2 digit user number (always 2 digits, i.e. [0] [3] for user 3).
Ø The LCD screen will prompt for a new code.
4. Enter the new [user code] designated for that individual. If it rejects the code because of a duplication or such, the sounder will beep 3 times.
5. If another user code needs to be programmed, return to step 3 and enter the user number.
6. To exit Code Programming, press [#] while the LCD screen is prompting for a new user.
Deleting User Codes:
1. Press [s] [5]. The LCD Screen will prompt for a code.
2. Enter [Master code]. The LCD Screen will prompt for a user number.
Ø For partitioned systems, if you are changing the code of another person, you must have access to all partitions, or at least all of the partitions to which the other person has access.
3. Enter the 2 digit user number (always 2 digits, i.e. [0] [3] for user 3).
Ø The LCD screen will prompt for a new code.
4. Press [Chime] [Chime] [Chime] [Chime] for a 4-digit code or [Chime] [Chime] [Chime] [Chime] [Chime] [Chime] for a 6-digit code.
5. If another user code needs to be deleted, return to step 3 and enter the user number.
6. To exit Code Programming, press [#] while the LCD screen is prompting for a new user.
Assigning User Code Authority Levels:
Assign authority levels to users by following the steps below. Assign user codes before assigning authority levels.
Ø You must have authority to the partition you wish to add or remove from another person’s authority.
1. Press [s] [5]. The LCD Screen will prompt for a code.
2. Enter [Master code]. The LCD Screen will prompt for a user number.
3. Enter the 2 digit user number (always 2 digits, i.e. [0] [3] for user 3).
Ø The LCD will now prompt you for the attributes in the following chart.
| Prompt | |
|---|---|
| Outputs used? | » DO NOT CHANGE THIS SEGMENT! |
| Open / Close Rprt? | |
| Bypass enable? | (It is for use by a professional installer only.) |
| Arm / Disarm? | |
| Master code? | |
| Sched arm only? | 0=No 1=Yes |
| Arm only? | Your key-press will apply to the user code you entered in Step 3. |
| Reserved | |
| Output 4 ? | |
| Output 3 ? | If these messages appear on the LCD screen, press the [r] key until you return to the prompt for the user code or until you exit this adjust mode. |
| Output 2 ? | If these messages appear on the LCD screen, press the [r] key until you return to the prompt for the user code or until you exit this adjust mode. |
| Output 1 ? |
4. The LCD will now display all of the partitions to which this user has access. If you wish to remove a partition, press the partition number on the code pad, and the display will mark that partition with a (-) hyphen indicating access has been removed. If you wish to reestablish user access to the partition, press the partition number again.
5. Press [s] to save the data. The LCD will then prompt you for the next user code.
6. If another user code needs to be programmed, return to Step 3. If not, press [#] to exit this feature without saving the data.